Monday, March 28, 2016

Spring has sprung, so it's time to plant stuff

I have been looking forward to spring ever since I moved here so that I could plant my herb garden without having to worry about cold nights killing them. I got them set up a few weeks ago, and this weekend they sprouted! Cilantro, basil, oregano, and parsley in the small pots, and the large pot will hopefully have jalapeno peppers coming in soon. I can't wait!


We also planted some lillies (my favorites), and they smell wonderful. Oriental lillies on the outside, Easter lillies on the inside. Just waiting for some more buds to open, then I will post a close up.


Speaking of Easter, I hope you enjoyed yours! We played it low-key, relaxed at home. I worked on a couple of projects. Still working on a blanket for my sister in law that's coming out great, and I added a new item to my shop! Here's a picture of the door wreath:


You can find it here: https://www.etsy.com/listing/273984058/spring-themed-door-wreath?ref=shop_home_active_1 This one is spring colors, lilac, pastel pink, and aquamarine. I've got one in red, white, and blue that I will be working on soon, and when I do, I will be writing up a tutorial for it. Stay tuned!

Until next time...


Tuesday, March 22, 2016

How I sneak vegetables into my picky eater

It's funny... when baby girl first started eating pureed foods, she LOVED veggies and wanted nothing to do with fruit. Once she started getting those foods in solid form though, she did a total 180 and has focused her attentions on fruits ever since. She would love nothing more than to make her entire diet out of blueberries, strawberries, raspberries, blackberries, apples, pears, watermelon, you name it. You give her broccoli, peas, green beans, or anything else of the vegetable persuasion though and it is more likely to land on the floor. For a while, I was able to get away sneaking veggies into her diet with the toddler fruit and veggie pouches, but I think she's been catching on.  I think she has figured out that if the color of the pouch is green, it is no bueno. Meats on the other hand... she's avoided like the plague from day one. Every now and then she'll take a corn-dog (not that those are really meat either, but still) or some chicken nuggets, but it's a rare occasion. So I've had to get creative.

I still buy the fruit and veggie pouches from the supermarket, because it's easy. The ones that she's willing to eat, I give her as is and she's happy. The ones she won't eat, I will sometimes mix in with tomato sauce and put on her pizza or pasta. The tomato sauce has a strong enough flavor that it will hide any other veggie flavors you add into it.

The latest trick I've been getting away with has been turning those same pouches into popsicles. Yes, you read that right: popsicles. I used Lickety Splits brand popsicle molds that I bought at Publix, but you can use whatever works for you. The measurements I used here work specifically for these molds though, so you may need to adjust the measurements if you use a different set of molds. Here's how I do it:


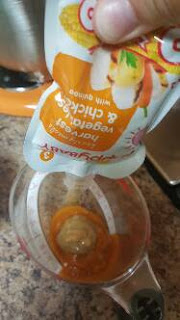
 For this batch, I used 2 pouches: one is chicken and hearty vegetables, the other one is carrots, broccoli, and pears. Usually I just use one pouch and the rest is applesauce though. You can do whatever works for your kid though.


Squeeze out the contents of the whole pouch...


Or in this case, both pouches. 


Using 2 pouches gave me about 3/4 cup of puree.  Then add 1/2 cup of applesauce. 


If you're only using one pouch (or if you aren't using any pouches and pureed fresh foods... go you! I used to but she knew what I was trying to pull), fill up the measuring cup with applesauce or some other pureed food until you have 1 and 1/4 cups of puree. Then add 1/4 cup of water (it thins it out a little, makes for a better consistency). You should have 1 and 1/2 cups in total.


I also added some cinnamon to it, because my daughter loves cinnamon. You can skip it if you want though.


Mix the whole thing up (fork works just fine).


 Then pour it out into your popsicle molds. The mold will show you the maximum fill line.


And that's it! Like I said, go with whatever you're trying to get your kids to eat, and mix it with something they like to mask the flavor, and you'll be good to go!


I hope you enjoyed this little tutorial. Let me know if you have any recommendations for future tutorials. Until next time...


Tuesday, March 15, 2016

Sunny days

There really is nothing like eating lunch outside on a sunny day to boost your mood. I even convinced baby girl to eat some turkey sandwich, where as she normally fights me tooth and nail about eating any meat! It's the small victories that matter right? Especially with how picky she has been lately. Although I have found a couple of ways to sneak meats into her foods... I'll have to post that one tomorrow!

 In other news, I did some more fabric shopping today. As it just so happens, hubby liked my aromatherapy mask last night, so he wants one for himself. And what better pattern for a manly-man than some camo! You can check them out here:  https://www.etsy.com/listing/271273265/hotcold-aromatherapy-eye-mask

I've also been working on a pattern for a chevron pillow cover. The pattern is working out well, and despite not being a huge personal fan of the color pink, I'm really diggin' the colors.


That may be getting put aside for a few days, though, while I work on a custom blanket for my sister-in-law. Remember that craft ADHD I was telling you about in an earlier post? Yeah, it's going in full force with me lately. As I have more work done on that one, I will definitely post it, I love the way it's coming out.

Tomorrow I'll post the sneaking meats and veggies into picky eaters idea that I mentioned earlier. Until then...

Monday, March 14, 2016

Allergy season is upon us... and it can suck it

Yup. I said it. In all fairness, my whole family is suffering right now. Baby girl, who is already going through a fussy-phase, has snot dripping down her nose 24/7 on top of it, so needless to say things have been a little rough lately. So I did what any normal person would do and started taking my allergy meds. Then tonight, I got the brilliant idea to break out one of my own products and get some aromatherapy involved. Cue my eye mask:


(And people wonder why I don't take selfies... believe me, the world is better off for it)

Let me tell you... this thing is wonderful. It can be used warm, room temperature, or cold. Personally, I prefer warm. All you have to do is pop it in the microwave at 30 second intervals until it reaches the heat-level you're looking for. Then just sit back, relax, and let the essential oils clear out your sinuses. I used eucalyptus in this one, but peppermint and rosemary have also come highly recommended.

I got the idea to add these to my shop because my wonderful chiropractor recommended the use of eucalyptus oil, just a dab under each nostril. The problem is that the oil would irritate my skin. So I went to my good friend Pinterest for some ideas, and here is the final product. And I must tell you, I've used it both resting on my eyes as well as just sitting on my chest pressed up against my nose (kinda like I'm doing right now as I type this). Tomorrow, I will be running out to the store to pick up some camo fabric to hook hubby up with one or two (he seems to be interested in both the sinus-relief scents and the stress-relief scents).

If you're interested in buying one for yourself, check out my shop for details! https://www.etsy.com/listing/271273265/hotcold-aromatherapy-eye-mask?ref=shop_home_active_2

Until next time,

Thursday, March 10, 2016

Baby girl's rocking chair

I love hand me downs. When my daughter was born, my mother-in-law gave me the rocking chair she used with her kids. I spent many hours and many nights sitting in that rocking chair with my daughter, and I remember thinking many times how much I should make a cushion for it. Well, after a year and 8+ months, I finally did it.

She likes sitting in it too, as you can see :)

I've had a few questions about why I shaped the back cushion the way I did. It's really just about aesthetics for me. The top of the rocking chair is wider than the seat, and it would have bothered me if the top of the rocking chair was sticking out past the cushion itself. I saw plenty of rocking chair DIY tutorials where that's exactly how they did it, and that's fine... it's just not my thing. Here's how I made mine. I even had my little helper working with me!

I started by measuring the seat and the back of the chair, and drew a template on a piece of cardboard.


 Then I traced out the cardboard template onto a piece of foam insert. I picked up a 1" thick foam insert, 24"x 72". This gave me enough to draw one seat back and two seat cushions (I wanted the seat cushion to be thicker than the back cushion).

 After cutting out the foam inserts, I traced the pattern on quilter's batting...

I gave myself an extra inch around the template so that I could pin and sew the batting around the foam.


I trimmed away the extra batting as I hand-sewed it closed, that way I could get a nice tight stitch around the foam.

Here's the finished foam inserts:
I set them on the chair, just to make sure the measurements were correct. Then I traced the foam inserts onto the fabric, again leaving about an inch around the insert to allow for the seam.

I hemmed the fabric to give myself a nice, clean edge to work with. Many people choose to just cut the material with pinking sheers. Either way works as far as I'm concerned, hemming just takes some extra time that may not have been necessary.
Once I hemmed the fabric, I sewed a zipper onto the narrow end of each cushion. It's the first time I ever used that function on my sewing machine, and it was easy as long as you follow the directions for your machine. I wanted to have the zipper so that I can take the cover off to wash it whenever needed, especially knowing that she would like sit in it as well.

After I sewed the zipper on the end, I stitched around the other three sides. I used a tight stitch for this. **NOTE**: remember to UNZIP the zipper before sewing around the other 3 sides, it can be difficult to unzip it afterwards in order to turn it right side out... trust me...

Repeat steps for the second cushion cover. Once the machine sewing is done, put the foam inserts into the covers, and set them on the rocking chair.

I bought some coordinating ribbon, 1.5" wide. With the cushions on the chair, I measured how much ribbon I wanted to sew on to tie the cushions to the chair. I chose to put ribbon in 3 locations on each side of the cushions, 2 on the back and 1 on the seat. I did this so that the cushions would be anchored on to the seat a bit stronger. I hand-stitched the ribbon into the cushion, and cut a V-shape into the ends of the ribbon to keep it from fraying. And that's it!
What do you think... do I add them to my shop? Leave your thoughts in the comments!
Have any questions about how I did it? Let me know... since this is my first DIY tutorial, I'd love some feedback to improve it!

Until next time...

Thursday, March 3, 2016

Wakey wakey, time to bakey!

Yea, it's a goofy title, I know. That's kinda my thing though.
So when my hands aren't full with crochet hooks, knitting needles, or working on a sewing machine, I actually love to bake. I'm not all that great at cooking, but baking is so much more of an exact science that even I have a hard time screwing it up. Yesterday I wanted something new to give to my daughter for breakfast, but something that she would still eat (she's going through her picky eater phase, so meal times are nothing short of impossible lately). She loves oatmeal in the morning, and will eat anything with applesauce in it, so I was really happy to find this recipe for apple-cinnamon-oatmeal muffins. They are really easy and quick to make, which is perfect for someone with her lack of patience. http://www.eatingonadime.com/oatmeal-applesauce-muffins-that-will-knock-your-socks-off/
And not only does she love them, but so does hubby! So it looks like I'll be making a lot of these to have on hand.
In the meantime, I'm also working on pushing my home goods line in the shop. The products really do work well... I know, because I use them in my own home. Hubby and I just cleaned out our cars this past weekend, and I used the washcloths to scrub the floor of my car. I use the swiffer cover as a wet swiffer, and it worked great for cleaning my kitchen floor. And I absolutely love the soap saver for my shower.
With spring coming, I figure people are starting to think of their spring cleaning projects (at least I am). Check it out! https://www.etsy.com/shop/StitchedBySovs?section_id=18538859&ref=shopsection_leftnav_4
I'm working on thinking up some more projects to add to the shop. I'll keep you posted as they come. Until then...