Last month was my daughter's birthday (I'm still trying to figure out where the last 4 years went...). When we asked her what kind of cake she wanted for her birthday, she said a red white and blue cake. She got the idea from a Tasty video she watched with me on Facebook recently that had a layer of red cake, a layer of white cake, and a layer of blue cake. Now, being the mean mommy I am, there was no way I was going to make a 3 layer cake for a 4 year old (I just don't need her having that much sugar in my life). However, I was totally open to making one cake that was red white and blue. So, instead of making it in layers, I went with more of a tie-dye kind of idea. Here's how I did it:
Supplies:
1 box white cake mix and all mixing requirements from the box directions (likely eggs and oil) (your preference what brand- I'm cheap, so I went store brand instead of name brand)
red food coloring
blue food coloring
one 8-inch cake pan
1 tub frosting
any decorations you choose (I used decorative frosting gel and sugar sprinkles)
Directions:
Preheat the oven to the temperature indicated on the box. If you're like me and like to use your extra-large toaster oven for baking so that you don't heat your whole house up by turning on the big oven, preheat your toaster oven to a lower temperature than the box calls for (I think my box called for 350*, so I only preheated my toaster oven to 325*). Prepare boxed cake mix according to directions on the box. Split the mix into 3 separate bowls (I just eye-balled it to be honest)
Leave one bowl of mix white; add red food coloring to the second bowl until you get the color you want (I think it took me about 6-7 drops to get the color I wanted); add blue food coloring to the third bowl until you get the color you want (again, about 6-7 drops)
Grease your cake pan (I use baking spray, but you can just butter it to grease it too). Pour the 3 bowls of mix into your greased cake pan.
Use something thing (I used a butter knife, because that's what I had on hand) and move it back and forth in the pan to swirl the batter colors together.
Bake your cake according to package directions. Once it's done baking, move it onto a cooling rack.
When the pan and the cake are cool, remove it from the cake pan and let it cool a little longer on the cooling rack. I flipped it upside down to check out how the color swirl came out.
Decorate it however you like. I'm not too great with writing to begin with, so it took me quite a while to get the writing here to come out legible.
This is how it looked on the inside.
For someone that doesn't bake all that often, this was really pretty easy to accomplish. I hope you enjoy it as much as we did!
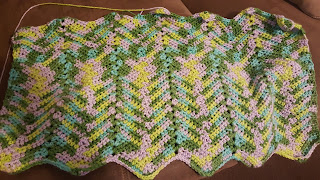
In other news, I've still got a bunch of projects on the hook. One of them is this ripple blanket:
Stay tuned for directions on how I do it once I'm done. Until next time...


No comments:
Post a Comment