
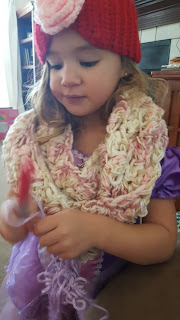
Hence wearing both the scarf and headband... inside the house... which was easily like 73* at the time this picture was taken. 😂 According to her daycare teachers, she'll wear them all day at daycare too (which is great advertising for my business!) She's also got kind of a funky way of wearing the scarf, but it seems to work for her.
I love the colors I used for it. I used these same colors to make a blanket for my baby niece a couple of months before, and had been looking for an excuse to use up the rest of the yarn. I've made so many blankets for my house that I wasn't sure making another one would be a good idea. Luckily, the amount of yarn I had left over was exactly enough to make the scarf.
I adapted this wonderful pattern for the blankets I made for my niece and nephew. You can find the original blanket pattern here.
I adapted this wonderful pattern for the blankets I made for my niece and nephew. You can find the original blanket pattern here.
Here's what I used:
1 skein gauge 4 worsted weight yarn in primary color (I used Caron Jumbo in Rosewood)
1 skein gauge 4 worsted weight yarn in contrast color (I used I Love This Yarn in Metallic Ivory)
Size Q hook
large plastic needle (for sewing the scarf closed and weaving in ends)


Abbreviations (pattern uses American crochet terms):
Ch: chain
sc: single crochet
dc: double crochet
st: stitch
Pattern is in multiples of 3 +2 (in case you want a wider or more narrow scarf).
Holding both colors together, ch 17.
Row 1: sc in 2nd ch from hook and each ch across (16 sc)
Row 2: Ch 1, turn. sc+2dc in first sc, *skip 2, sc+2dc in next st, repeat from * across, sc in last sc (5 sc+2dc clusters).
Row 3: Ch 1, turn. sc+2dc in first sc, *skip2, sc+2dc in next sc, repeat from * across, sc in last sc.

Repeat row 3 until the scarf measures the length you want. I made my daughter's scarf about 60".
Last row: Ch 1, turn. sc in each st across (16 sc). Finish off, leaving a long tail to sew the scarf closed (if you're making an infinity scarf, that is). Fold the scarf so that the 2 ends match up, and whip stitch across to close the scarf. Weave in your ends, and you're done! :)


She's lucky she's so stinkin' cute... she's always stealing my hooks!
As you can see in the picture a little further up, I did not make my first row all single crochets. Not doing so led to this happening when the scarf was stitched together and my daughter started wearing it because the first row of stitches for all stretched out because of skipping chains in the foundation chain...

Yeah, not one of my prouder moments. That's why I changed up the pattern to have both the first and last row be a sc row because it made closing the scarf look neater. However, if you want to leave your scarf open, you are more than welcome to leave those off and do row 2 pattern directly into the foundation chains. This will leave your corners a bit more rounded.
The lovely thing about this pattern is that it is so versatile. If you want a wider scarf, just add chains to your foundation chain. If you want a thicker scarf, use more colors. If you only want to use one color, go right ahead. If you want tighter stitches, use a smaller hook. The possibilities are endless!
Not gonna lie, guys-- I'm still kinda new to writing and sharing my patterns. Let me know in the comments if you think the instructions are clear, or if you have any suggestions for edits.
Until next time...

No comments:
Post a Comment